
An SSL (Secure Sockets Layer) certificate is a digital certificate that ensures secure and encrypted communication between a client (such as a web browser) and a server. It plays a crucial role in safeguarding sensitive data transmitted over the internet, including login credentials, personal information, and financial data.
Let us look at two ways of generating SSL Certificates.
- Self Signed Certificate
- CA Signed Certificate
Self-Signed Certificate :
Step 1: Installing openssl
brew install openssl
echo 'export PATH="/usr/local/opt/openssl/bin:$PATH"' >> ~/.bash_profile
source ~/.bash_profile
Step 2: Create a Private Key
openssl genrsa -des3 -out domain.key 2048Step3: Create a CSR
$openssl req -key domain.key -new -out domain.csr

Enter pass phrase for domain.key:
You are about to be asked to enter information that will be incorporated
into your certificate request.
What you are about to enter is what is called a Distinguished Name or a DN.
There are quite a few fields but you can leave some blank
For some fields there will be a default value,
If you enter '.', the field will be left blank.
-----
Country Name (2 letter code) [AU]:IN
State or Province Name (full name) [Some-State]:KA
Locality Name (eg, city) []:KLR
Organization Name (eg, company) [Internet Widgits Pty Ltd]:Akamai
Organizational Unit Name (eg, section) []:GSS
Common Name (e.g. server FQDN or YOUR name) []:www.achuth.tech
Email Address []:achuthadivine@gmail.com

Please enter the following 'extra' attributes
to be sent with your certificate request
A challenge password []:
An optional company name []:
[~/Achuth/code_base/python-server/flask/certs/selfsigned]$:
Check the certificate generated.
$openssl x509 -text -noout -in domain.crt
Certificate:
    Data:
        Version: 1 (0x0)
        Serial Number:
            3a:6b:3f:cb:44:6f:1d:87:57:30:74:35:5a:bd:2d:3e:e4:8d:f6:73
        Signature Algorithm: sha256WithRSAEncryption
        Issuer: C = IN, ST = KA, L = KLR, O = Akamai, OU = GSS, CN = www.achuth.tech, emailAddress = achuthadivine@gmail.com
        Validity
            Not Before: Mar 21 04:54:17 2022 GMT
            Not After : Mar 21 04:54:17 2023 GMT
        Subject: C = IN, ST = KA, L = KLR, O = Akamai, OU = GSS, CN = www.achuth.tech, emailAddress = achuthadivine@gmail.com
        Subject Public Key Info:
            Public Key Algorithm: rsaEncryption
                RSA Public-Key: (2048 bit)
                Modulus:
                    00:bb:8c:66:c1:71:4a:02:07:d1:60:00:7c:78:0b:
                    00:77:d8:7c:34:80:e6:00:0a:2b:bd:03:13:1f:90:
                    b6:47:b4:a8:87:f7:05:40:e6:14:e3:ae:67:37:bd:
                    3b:88:4a:2b:91:f0:87:7c:64:20:7d:a0:ac:8e:cf:
                    c2:c8:57:4c:8e:8e:38:fa:f1:7d:b2:ec:37:e5:31:
Step4 : In the Flask server , you can reference the server to pick the generated self signed cert
if __name__ == '__main__':
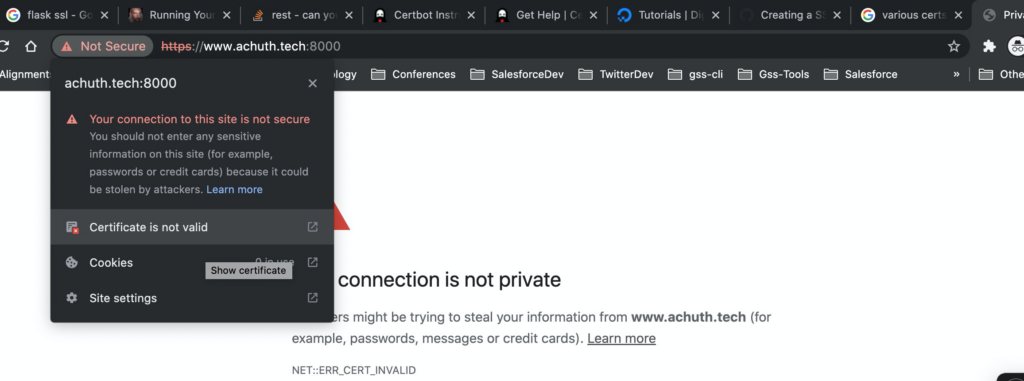
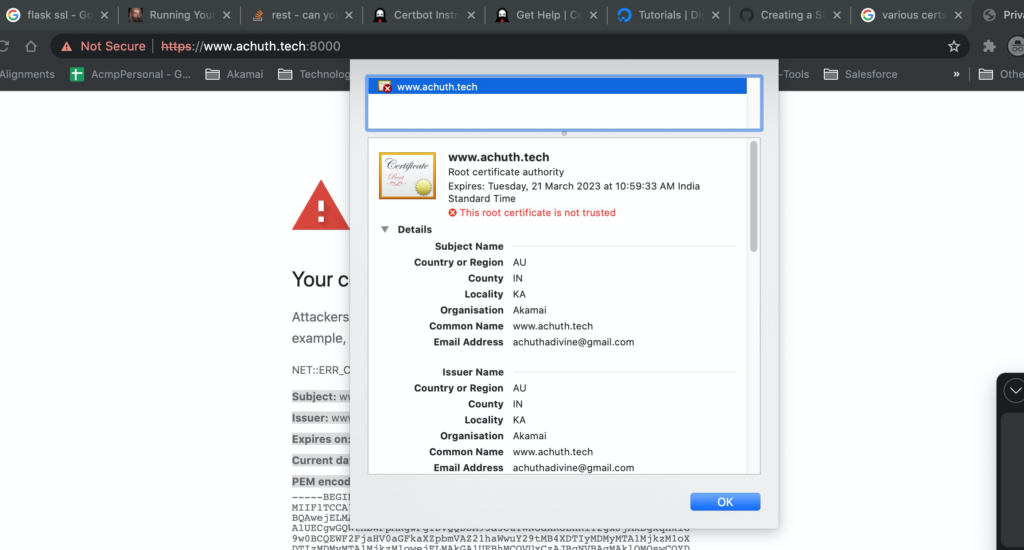
app.run(debug=True,host='0.0.0.0', port=8000,ssl_context=('selfsignedkeys/cert.pem','selfsignedkeys/key.pem') )Step5 : Request from Browser and can confirm that server is sending the server cert.
CA Signed Certificate: For the illustration, we shall use Lets Encrypt CA.
Step1: Install certbot[A bot of Lets Encrypt] in the macOS
$brew install certbotStep2 :Generate the CSR and submit to Lets Encrypt.
In this example I am asking for DNS Challenge. So that i can add the TXT records in my domain to prove my ownership on the domain.
[~/Achuth/flask/certs/certbot]$:sudo certbot -d encrypt.achuth.tech --manual --preferred-challenges dns certonly

Saving debug log to /var/log/letsencrypt/letsencrypt.log
Requesting a certificate for encrypt.achuth.tech

- - - - - - - - - - - - - - - - - - - - - - - - - - - - - - - - - - - - - - - -
Please deploy a DNS TXT record under the name:

_acme-challenge.encrypt.achuth.tech.

with the following value:

pekWo4QjuuXBGi_1my9RfN093jccg5qYt8ZXty3EYeo

Before continuing, verify the TXT record has been deployed. Depending on the DNS
provider, this may take some time, from a few seconds to multiple minutes. You can
check if it has finished deploying with aid of online tools, such as the Google
Admin Toolbox: https://toolbox.googleapps.com/apps/dig/#TXT/_acme-challenge.encrypt.achuth.tech.
Look for one or more bolded line(s) below the line ';ANSWER'. It should show the
value(s) you've just added.

- - - - - - - - - - - - - - - - - - - - - - - - - - - - - - - - - - - - - - - -
Press Enter to Continue

Successfully received certificate.
Certificate is saved at: /etc/letsencrypt/live/encrypt.achuth.tech/fullchain.pem
Key is saved at:         /etc/letsencrypt/live/encrypt.achuth.tech/privkey.pem
This certificate expires on 2022-06-19.
These files will be updated when the certificate renews.

NEXT STEPS:
- This certificate will not be renewed automatically. Autorenewal of --manual certificates requires the use of an authentication hook script (--manual-auth-hook) but one was not provided. To renew this certificate, repeat this same certbot command before the certificate's expiry date.

- - - - - - - - - - - - - - - - - - - - - - - - - - - - - - - - - - - - - - - -
If you like Certbot, please consider supporting our work by:
 * Donating to ISRG / Let's Encrypt:   https://letsencrypt.org/donate
 * Donating to EFF:                    https://eff.org/donate-le
- - - - - - - - - - - - - - - - - - - - - - - - - - - - - - - - - - - - - - - -
[~/Achuth/code_base/python-server/flask/certs/certbot]$:
Step 3: Move the certs to local directory as flask server
$sudo mv /etc/letsencrypt/live/encrypt.achuth.tech/fullchain.pem cert.pem
$sudo mv /etc/letsencrypt/live/encrypt.achuth.tech/privkey.pem key.pem
Step 4 : Reference the cert and key from your Flask server code
if __name__ == '__main__':
    app.run(debug=True,host='0.0.0.0', port=8000,ssl_context=('certbotkeys/cert.pem','certbotkeys/key.pem') )